
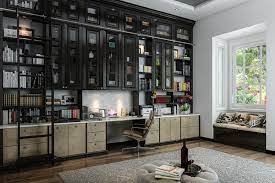
Creating a functional and organized home office is essential for productivity and efficiency. Custom shelves provide an excellent solution to maximize space and tailor storage to your specific needs. In this guide, we’ll explore step-by-step instructions on building custom shelves for your home office, ensuring a personalized and efficient workspace.
1. Measure and Plan Your Space
Begin by measuring the available space in your home office where you intend to install the custom shelves. Consider the height, width, and depth of the area. Take note of any existing furniture or features that may impact the design. Use these measurements to create a detailed plan for your custom shelves.
2. Determine the Purpose of the Shelves
Before diving into the design, determine the primary purpose of your custom shelves. Are they for displaying books, organizing office supplies, or showcasing decorative items? Understanding the intended use will guide the design and help you prioritize the features and dimensions of the shelves.
3. Select the Right Materials
Choose high-quality materials that suit the aesthetics of your home office. Common materials for custom shelves include plywood, MDF (Medium Density Fiberboard), or solid wood. Consider the finish and color that will complement your existing decor. Additionally, purchase sturdy shelf brackets or supports to ensure the stability of the shelves.
4. Design the Shelf Layout
Based on your measurements and the purpose of the shelves, create a detailed design for the shelf layout. Decide on the number of shelves, their spacing, and the distance between each shelf. Consider incorporating adjustable shelves for added flexibility, allowing you to adapt the space as your storage needs change.
5. Cut the Shelves to Size
Using the measurements from your plan, carefully cut the shelves to the desired size. Ensure precise and straight cuts for a professional-looking finish. If you don’t have the tools or skills for cutting, many home improvement stores offer cutting services to achieve accurate dimensions.
6. Sand and Finish the Shelves
Smooth the edges and surfaces of the cut shelves using sandpaper. This step is crucial for achieving a polished and splinter-free appearance. After sanding, apply the chosen finish or paint to enhance the durability and aesthetics of the shelves. Allow sufficient drying time before moving on to the next step.
7. Install the Shelf Supports
Position and install the shelf supports or brackets according to your design. Use a level to ensure that the supports are straight and evenly spaced. If your shelves are heavy or will hold substantial items, consider using wall anchors for additional support. Make sure the supports are securely attached to the wall.
8. Place the Shelves on the Supports
Carefully place the finished shelves onto the installed supports. Double-check their alignment and adjust if necessary. If you opted for adjustable shelves, test different configurations to find the arrangement that best suits your storage needs.
9. Secure the Shelves in Place
Once satisfied with the placement of the shelves, secure them in place. Depending on the design and supports chosen, this may involve attaching the shelves to the brackets or using screws to ensure they are firmly anchored. Follow the manufacturer’s guidelines for any specific hardware used.
10. Organize Your Home Office Essentials
With your custom shelves in place, take the opportunity to organize your home office essentials. Arrange books, office supplies, or decorative items in a way that enhances both functionality and aesthetics. Consider using storage bins or baskets for smaller items to maintain a tidy and streamlined look.
11. Add Personal Touches and Decor
Custom shelves offer an excellent opportunity to infuse your home office with personal touches and decor. Display meaningful items such as family photos, artwork, or decorative pieces that inspire creativity and productivity. This personalization contributes to a more inviting and motivating workspace.
12. Regularly Evaluate and Adjust
As your home office needs evolve, regularly evaluate the effectiveness of your custom shelves. Adjust the shelf layout or configuration as needed to accommodate changes in storage requirements. This ongoing assessment ensures that your home office remains organized and tailored to your work habits.
By following these steps, you can build custom shelves for your home office that not only provide practical storage solutions but also enhance the overall design and functionality of your workspace. Tailor the shelves to your specific needs, and enjoy the benefits of a well-organized and personalized home office environment.